Clarified Butter:
Clarified butter is also known as drawn butter. Regular butter contains water and milk solids in addition to the butterfat. Clarified butter is obtained by removing the water and milk solids leaving only a golden and translucent butter fat behind. One of the advantages of using clarified butter in cooking is that it has a much higher smoking point (375° F) than regular butter. This means that you can cook at higher temperatures with it and it also stay fresh for a longer period of time because the milk solids have been removed.
Some people will use the terms clarified butter and ghee interchangeably, but there is a difference. Ghee is often used in Indian cuisine. It is similar to clarified butter, but it is cooked longer. The longer cooking time removes all the moisture from the butter and the milk solids are allowed to brown or caramelize in the butterfat before it is strained. This caramelizing of the milk solids gives the ghee a nutty flavor.
Tips for making clarified butter and ghee:
Always begin with a high quality unsalted butter, preferably organic. Cheap butter will usually contain a lot of water and artificial chemicals and ingredients; this also makes it burn a lot faster.
The process of clarifying the butter means you will be removing excess liquid as well as milk solids, so you will need to start with about 25% more butter than the amount of clarified butter or ghee you want to end up with. For example:
1 pound (2 cups) of butter will yield about 1-1/2 cups of clarified butter or ghee
When making clarified butter be sure to use a deep stainless steel pan with a heavy bottom. Keep the heat on low so that the milk solids don’t burn. If you want to speed up the amount of time it takes for the butter to melt, cut it into smaller pieces, but do not turn up the heat. Also, be sure to never put a cover on the pan while cooking the butter.
Some people prefer to use a double boiler because it allows for the gentle even heating necessary to keep the butter from burning, but allows you to go about other tasks in the kitchen without having to watch the butter constantly. This is the recommended method for anyone new to making clarified butter because it helps ensure that the milk solids do not burn.
Clarified butter and ghee will both keep for about 6 months when stored at room temperature and about 1 year if stored in the refrigerator. Store in a covered glass jar.
Clarified butter is great for many types of cooking and can often be used instead of regular butter. You can use it for butter based sauces such as Béarnaise and Hollandaise as well as for sautéing. It brings the delicious taste of butter without the risk of burning. Clarified butter is also wonderful with crab and lobster.
How to make your own clarified butter or ghee:
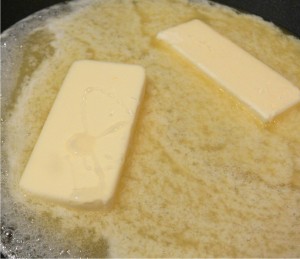
Place one pound (2 sticks) of unsalted, high quality butter in a sauce pan or double boiler. Melt the butter over low heat. Once the butter is melted, continue heating over low heat.
The butter will begin to sputter and foam as the water starts to burn off. Keep boiling and do not cover. The butter will begin to separate into 3 different layers.
Top layer: this will be the foam that forms on the top as the water in the butter boils off.
Middle Layer: this is the clarified butter and consists of the translucent golden liquid butter.
Bottom layer: this is where the milk solids begin to accumulate; be careful that they do not start to burn.
When most of the water has been boiled off and the top layer no longer has much foam on it you should notice that most of the milk solids have accumulated on the bottom of the pan. This will usually take about 30 minutes, but will vary depending on the type of pan you use and your particular heat source. Your clarified butter should have a beautiful transparent gold color. Remove from heat (it can easily burn at this point).
If you are making ghee, you will need to continue cooking the clarified butter over low heat, stirring occasionally; be very careful that it doesn’t burn. Continue cooking until the milk solids begin to turn a light brown and the butter becomes fragrant and the translucent liquid takes on a deep golden color. Watch the butter carefully and remove from heat as soon as it reaches this point. If you let it cook too long the solids will burn, leaving the ghee with a burnt taste.
Once you remove the clarified butter or ghee from the heat you can skim off any remaining foam that is on the surface. Let it cool so that more of the milk fat solids settle to the bottom, then slowly pour off the clarified butter being careful to leave the milk fat solids behind in the pan.
You can also use cheesecloth, coffee filter or a fine mesh strainer to filter the hot melted butter; this will leave just the clarified butter coming through the cheesecloth.
The easiest way to separate the clarified butter is to pour it into a container and let it cool. Once it is room temperature put the container in the refrigerator. The butter will solidify and the foam can easily be scraped off the top.


